Getting Started with microk8s and Helm
This guide demonstrates how to get microk8s and Helm running on a debian-based server (e.g. ubuntu).
Install microk8s and Helm
Automatic Installation script 🤖
Instead of following the below installation guide, you can also run the bash script:
The script has been tested in Debian.
Download: microk8s_setup.sh
chmod +x microk8s_setup.sh
./microk8s_setup.sh
This script will optionally:
- Setup non default MicroK8s storage path (see section Storage)
- Install Snap and MicroK8s
- Configure roles and permissions
- Export Kubeconfig
- Add /snap/bin to PATH
Manual Installation
If you prefer to install manually, follow the steps below.
Update System Packages
Assuming you are working with a freshly installed OS, be sure to first update the system packages before proceeding:
sudo apt update -y && sudo apt upgrade -yInstall snap
We will use the snap package manager for installing and managing microk8s. First, install the snap daemon
sudo apt install -y snapdINFO
You may be asked during installation about which timezone you are in. This can occur twice, once for the region and once for a city. For both, enter the number corresponding to the option that best fits your location and press Enter to continue with installation.
Before continuing, check whether you can run commands using snap by executing snap list. If this returns an error, then the snap executable needs to be added to the PATH environment variable. This can be done easily be running the following command:
echo 'export PATH=$PATH:/snap/bin' >> ~/.bashrc && source ~/.bashrcPrepare Storage before Install (Optional)
Because we need to be able to download and store several container images, we need to ensure that there is enough disk space available. By default, microk8s will store everything on your root file system located at /. Depending on how your server was setup, bulk storage may be located on a different logical volume (LV) than your root file system. You can check this by running:
df -h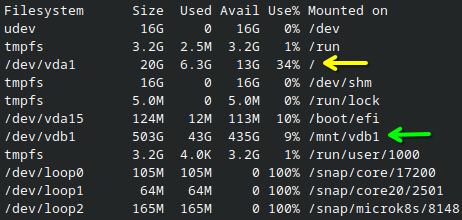
/ (yellow arrow) only has 13GB available, but a different LV mounted at /mnt/vdb1 (green arrow) has 435GB.If you need to use a different LV for storage, you can either:
Option A (Recommended for simplicity): Mount (or symlink) the SNAP_COMMON directory to your preferred destination.
TIP
This storage configuration step should be performed before installing microk8s to avoid needing to migrate data later.
Ensure the target directories exist and then mount the volume:
# Create the target directory and the mount point
mkdir -p /mnt/vdb1/microk8s/common
sudo mkdir -p /var/snap/microk8s/common

# Bind mount
sudo mount --bind /mnt/vdb1/microk8s/common /var/snap/microk8s/common

# for persistence
echo "/mnt/vdb1/microk8s/common /var/snap/microk8s/common none bind 0 0" | sudo tee -a /etc/fstab
Option B (after installation): Configure containerd to use a different root. This option is performed after installation and shown in the section "Setup microk8s".
Install microK8s
Install the core dependency along with microk8s using snap:
sudo snap install core && sudo snap install microk8s --classic --channel=1.32Verify you can run microk8s:
microk8s versionWARNING
If you see a message saying Insufficient permissions to access MicroK8s., then visit fixing microk8s permissions in the Troubleshooting section.
Install Helm
We will install helm using its install script that we can get using curl. First install curl:
sudo apt install curlInstall Helm:
curl -fsSL -o get_helm.sh https://raw.githubusercontent.com/helm/helm/main/scripts/get-helm-3
chmod 700 get_helm.sh
./get_helm.sh
Setup microk8s
Storage Setup after Installation (optional)
As discussed before, we may need to change the micro8s filesystem path to another drive with more available storage. If you have not mounted the SNAP_COMMON path before the microk8s installation, you can edit the config after installation as shown here.
Replace <new mount> in the following command with the mount path of the LV you want to use for storage and then execute the command:
cat <<EOF > /var/snap/microk8s/current/args/containerd
--config \${SNAP_DATA}/args/containerd.toml
--root <new mount>/var/lib/containerd
--state <new mount>/run/containerd
--address \${SNAP_COMMON}/run/containerd.sock
EOF
For the example above, we would replace <new mount> with /mnt/vdb1.
Restart microk8s to apply this change:
sudo snap restart microk8sGenerate the Configuration
Now create a folder for the microk8s configuration at ~/.kube:
mkdir -p ~/.kube && chmod 0700 ~/.kubeGenerate a configuration file and store it in this new folder:
microk8s kubectl config view --raw > ~/.kube/configTIP
You can shorten the command for interacting with the k8s API by creating an alias:
echo "alias kubectl='microk8s kubectl'" >> ~/.bashrc && source ~/.bashrcThis configuration is required for Helm to work properly. Check whether Helm can contact the microk8s API by running:
helm listWARNING
If you see a message saying Error: Kubernetes cluster unreachable: Get "http://localhost:8080/version": dial tcp 127.0.0.1:8080: connect: connection refused, then try the following:
- Ensure you have permission to read/write the
.kube/folder:chown -f -R $USER ~/.kube - Regenerate the microk8s configuration file:
microk8s kubectl config view --raw > ~/.kube/config
Install Required Addons
Several features which are required by the flame node software can be enabled in microk8s through its "addons". Run the following to activate these addons:
microk8s enable dashboard
microk8s enable ingress
microk8s enable dns
microk8s enable hostpath-storage
microk8s enable metrics-server
Final Checks
Ensure that you can run the following without errors
| Service | Command | Expected Output | Troubleshooting Step |
|---|---|---|---|
| microk8s | microk8s version | MicroK8s v1.32.3 revision 8148 | Check whether the current user is part of the microk8s group: groups If not, then end the current session and log back in or run newgrp microk8s |
| ingress | microk8s status | enabled: <br>...<br>ingress | Enable ingress addon: microk8s enable ingress |
| hostpath-storage | microk8s status | enabled: <br>...<br>hostpath-storage | Enable ingress addon: microk8s enable hostpath-storage |
| helm | helm list | NAME NAMESPACE REVISION UPDATED STATUS CHART APP VERSION | Go through the steps in the Generating the Configuration section |
Troubleshooting
Fixing microk8s permissions
The default user for your server needs to be added to the "microk8s" group to execute commands for the microk8s service. Run the following to add the current user to the group:
sudo usermod -a -G microk8s $USERThen you need to reload the user groups by either rebooting or running:
newgrp microk8sFinally, check if you have sufficient permissions to interact with microk8s:
microk8s version