Getting Started with minikube and Helm
This guide demonstrates how to get minikube and Helm running on a debian-based server (e.g. ubuntu). Docker is required as minikube runs inside a container.
Install Docker
Update System Packages
Assuming you are working with a freshly installed OS, be sure to first update the system packages before proceeding:
sudo apt update -y && sudo apt upgrade -yDocker Script
These are the summarized instructions for installing Docker on Ubuntu. For more details, visit https://docs.docker.com/engine/install/ubuntu/
Setup Docker' apt Repository
# Add Docker's official GPG key:
sudo apt-get update
sudo apt-get install ca-certificates curl
sudo install -m 0755 -d /etc/apt/keyrings
sudo curl -fsSL https://download.docker.com/linux/ubuntu/gpg -o /etc/apt/keyrings/docker.asc
sudo chmod a+r /etc/apt/keyrings/docker.asc

# Add the repository to Apt sources:
echo \
  "deb [arch=$(dpkg --print-architecture) signed-by=/etc/apt/keyrings/docker.asc] https://download.docker.com/linux/ubuntu \
  $(. /etc/os-release && echo "${UBUNTU_CODENAME:-$VERSION_CODENAME}") stable" | \
  sudo tee /etc/apt/sources.list.d/docker.list > /dev/null
sudo apt-get update
Install Docker and its Plugins
sudo apt-get install docker-ce docker-ce-cli containerd.io docker-buildx-plugin docker-compose-pluginPost Docker Installation Steps
Create Group
Create a docker group
sudo groupadd dockerAdd your user to the docker group
sudo usermod -aG docker $USERExit your session and log back in to apply the changes.
Test Image Pull
Check whether you are able to pull docker images at this point:
docker pull alpineIf you have any issues, follow the tips in the Docker Troubleshooting section.
Configure a Volume Mount for Image Storage (optional)
It may be that your server has a separate volume mounted for mass storage. By default, Docker uses the root directory /var for storage, and this may be limited depending on how your serever is configured. You can check whether your bulk storage is located on a different logical volume (LV) by running:
df -h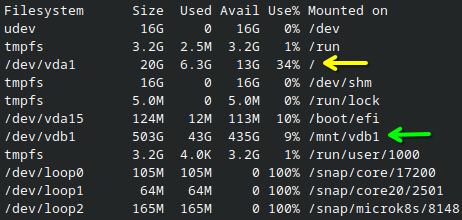
/ (yellow arrow) only has 13GB available, but a different LV mounted at /mnt/vdb1 (green arrow) has 435GB.If you need to use a different LV for storage, perform the following steps replace <mount-path> with the path for your mounted volume e.g. /mnt/vdb1:
- Stop the Docker service
sudo systemctl stop docker- Make a folder on your LV where you want to store images
sudo mkdir -p <mount-path>/docker- Edit or create
/etc/docker/daemon.jsonto configure the data root path
{
  "data-root": "<mount-path>/docker"
}- Start Docker
sudo systemctl start docker- Verify the New Configuration
docker info | grep "Docker Root Dir"should show something like this:
Docker Root Dir: <mount path>/dockerDocker Troubleshooting
Configure Proxy Settings for Docker
If your institution is behind a proxy, you have to inform Docker how to use it.
Create a directory for Docker configurations and create a configuration file called proxy.conf:
sudo mkdir -p /etc/systemd/system/docker.service.d
sudo nano /etc/systemd/system/docker.service.d/proxy.conf
Add the following to proxy.conf, replacing the proxy address with the one for your institution:
[Service]
Environment="HTTP_PROXY=http://proxy.place.com:3128"
Environment="HTTPS_PROXY=http://proxy.place.com:3128"
Environment="NO_PROXY=localhost,127.0.0.1,10.0.0.0/8"
TIP
For certain domains and hostnames to access the server, you may also need to include them in your NO_PROXY variable. If you already know the domain you will provide the FLAME Node deployment, add it to the NO_PROXY variable now.
Reload the daemon and restart Docker:
sudo systemctl daemon-reload
sudo systemctl restart docker
Install minikube
Download minikube Install Script
curl -LO https://storage.googleapis.com/minikube/releases/latest/minikube-linux-amd64
sudo install minikube-linux-amd64 /usr/local/bin/minikube
rm minikube-linux-amd64
Install kubectl
Download and Run the Install Script
This is the binary used for querying the resources in minikube.
curl -LO "https://dl.k8s.io/release/$(curl -L -s https://dl.k8s.io/release/stable.txt)/bin/linux/amd64/kubectl"Configure the Binary
sudo install -o root -g root -m 0755 kubectl /usr/local/bin/kubectlDeploy minikube
finally, we are ready to deploy the minikube container. We will deploy it with a specific network plugin called calico which is used for creating new analysis containers. Additionally, we need to enable the ingress addon for minikube. This addon allows received web traffic to be properly routed by minikube.
minikube start --network-plugin=cni --cni=calico --addons=ingressInstall Helm
Helm is used for deploying charts, which are pre-packaged and configured kubernetes resources. This is required for deploying FLAME Node as it is provided as a helm chart.
curl -fsSL -o get_helm.sh https://raw.githubusercontent.com/helm/helm/main/scripts/get-helm-3
chmod 700 get_helm.sh
./get_helm.sh
Install HAProxy
A reverse proxy is required for routing incoming web traffic to minikube. Here, we use haproxy within a Docker container to handle this work.
Create haproxy.cfg
First we need to create the configuration file that we will pass to the haproxy container at runtime. Save the following in a file called haproxy.cfg:
global
  log stdout format raw daemon debug
  maxconn 60000
  log 127.0.0.1 local0
  log 127.0.0.1 local1 notice
  user  haproxy
  group haproxy

defaults
  log global
  option httplog
  option dontlognull
  mode http
  timeout client 10s
  timeout connect 5s
  timeout server 10s
  timeout http-request 10s

frontend all
  bind :80
  bind :443 ssl crt /usr/local/etc/haproxy/certs/ssl.pem
  http-request redirect scheme https unless { ssl_fc }
  mode http
  use_backend cluster

frontend stats
  mode http
  bind :8404
  stats enable
  stats refresh 10s
  stats uri /stats
  stats show-modules
  stats admin if TRUE

backend cluster
  mode http
  server node $MINIKUBE_IP:80 check
In order to use TLS for encrypting traffic, a single ssl.pem file containing the required certificates and any associated private keys needs to be created. The contents need to have the following order:
- private key (either at the start or end of the file)
- SSL certificate
- CA-Bundle
- root CA.
cat my.key example.crt ... > ssl.pemNote
The proxy will redirect all HTTP request to HTTPS if port 80 is open.
For more information and other configuration possibilities on client-side encryption with HAProxy click here.
Deploy HAProxy Container
Run the following to create a haproxy container that binds port 80, 443 and 8404 and routes traffic to minikube using the recently created haproxy.cfg file:
docker run --name "haproxy" \
    -p 80:80 \
    -p 443:443 \
    -p 8404:8404 \
    -d \
    --rm \
    --sysctl net.ipv4.ip_unprivileged_port_start=0 \
    -v ./haproxy.cfg:/usr/local/etc/haproxy/haproxy.cfg \
    -v ./ssl.pem:/usr/local/etc/haproxy/certs/ssl.pem \
    -e MINIKUBE_IP="$(minikube ip)" \
    --network "minikube" \
    haproxy:3.1.7-alpine3.21@sha256:3e1367158e93d65d0186d6b2fb94b0a5a5d7e1cac0cabedb0cda52c80dad1113
TIP
The frontend stats can be used for debugging purposes. To access it, forward port 8404 to port 8404 on the remote machine where the frontend is bound. Therefore, run ssh -N -L 8404:localhost:8404 <USERNAME>@<IP> locally and visit http://localhost:8404/stats in your browser. Note that this command does not create any output and will run until you interrupt it.
Final Steps
At this point, the domain pointing to this server should be routed to minikube. Open a browser and navigate to the domain and you should see an nginx 404 page. If this is true, you can continue with the FLAME Node Deployment.